Sometimes, business travel takes
us to incredible places but we don’t always travel with a professional camera
to capture some of the sights we see along the way. Use these tips to take amazing pictures with
your smartphone!
Keep it Handy
First things first, make sure
your phone and your camera app are easily accessible. No amount of photo tips will help you if you
miss the shot altogether. Make sure you
know how to open your camera app as quickly as possible. With the iPhone, you can access the camera
without even unlocking the phone. With
some android phones, you can reassign buttons to launch the camera
quickly.
Clean the Lens
Your phone spends a lot of time
in hands, pockets, purses and other places that present opportunities for oil,
lint and dirt. Make sure you clean the
lens often!
HDR
If your phone as an HDR
(high-dynamic-range imaging) setting, USE IT!
This setting gives your pictures a greater dynamic range between the
lightest and darkest areas of the image which will more accurately photograph
the scenery the way you are seeing it live.
Current Androids and iPhones come with HDR settings, if your phone
doesn’t, there are apps you can download to take HDR images. The pictures here give an example of an HRD
photo (right) compared to a standard photo (left) taken with an iPhone.
Avoid Using the Zoom
Your smartphone cannot magnify
the image by moving its lens. So when
you digitally zoom in, the phone is essentially making the pixels larger and
using the information available to make the image larger. Pretend the zoom does not exist and get
closer to your subject. If you have to,
crop the image later instead of using the zoom.
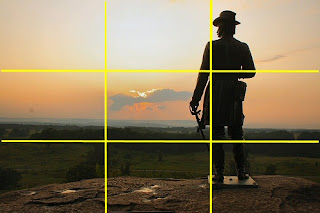
Rule of Thirds
 This Photography 101 composition
concept never fails! Most phones today
come with a setting to add gridlines to your screen when you are taking a
picture. The grids will divide the image
up into thirds both horizontally and vertically. Using the rule of thirds, place the
interesting or focus element of the photo on one of the four intersections of
the grid. This gives your photo visual
interest and balance. Additionally, your
horizon should run along one of the horizontal lines and not though the center
of the photo. As a bonus, you can use
the grid lines to make sure you don’t take a crooked snapshot!
Lighting
Your phone does best in natural
light found outdoors. Although the
technology has come a long way in a short amount of time, we still have a long
way to go for smartphone photos in low light situations inside and nighttime
photography. You’ll get the best results
in the morning or evening, when the sun is not directly overhead to flatten
your colors and create intense shadows.
Even shade during the middle of the day will also serve you well or you
can try using your flash midday to fill in dramatic shadows for a more even
look.
Edit
You don’t have to be a photoshop
expert to improve your photos with a few quick edits. Boosting the contrast, sharpness and/or
saturation can make a huge difference!
Your smartphone likely offers a few of the basic corrections and may
even offer some artistic effects. If you
want more, try apps like Snapseed, PicsArt Photo Studio, Adobe Photoshop
Express and the ever-popular Instagram.
All available for free in the iTunes App Store and the GooglePlay App
Store.
External Lenses
Although you can take great
photos with just your smartphone, you can go the extra mile by purchasing a
small external lens for your phone.
There are tons of companies selling external lens with prices beginning
at just $20. You can select from
wide-angle or fisheye to capture a whole room in one shot, telephoto for a
powerful zoom, macro for intense detail in your up close and personal
shots. Check out the Photojojo store
here or search for reviews of various lenses
available for your phone to see what will suit you and your photography best.
Practice and Explore
Finally, it’s essential to
practice and explore to become a pro-smartphone photographer. Study a little travel photography to get a
sense of what the real pros do and what you like best. Silence your inner critic and challenge
yourself to take tons of photos, even when you think it won’t come out
well. You can give yourself assignments
like: take 20 photos each hour while exploring the city or every time you take
a picture, try at least 5 different angles.
The practice will help you understand what works and what doesn’t; plus,
you might get a surprisingly good photo when you wanted to take a pass.


No comments:
Post a Comment